こんにちは!
今回はJavaScript入門ということで、バニラJSを使って簡単なお買い物リストアプリを作っていきたいと思います。
「JavaScriptを使ってお買い物リストアプリを作ってみたい」
「JavaScriptの基本的な使い方を知りたい」
などお考えの方は参考になるかと思います。
本記事を読むと、以下のようなことがわかります。
- JavaScriptの基本的な使い方
- JavaScriptでWebアプリケーションを作る流れ
それでは、さっそく見ていきましょう!
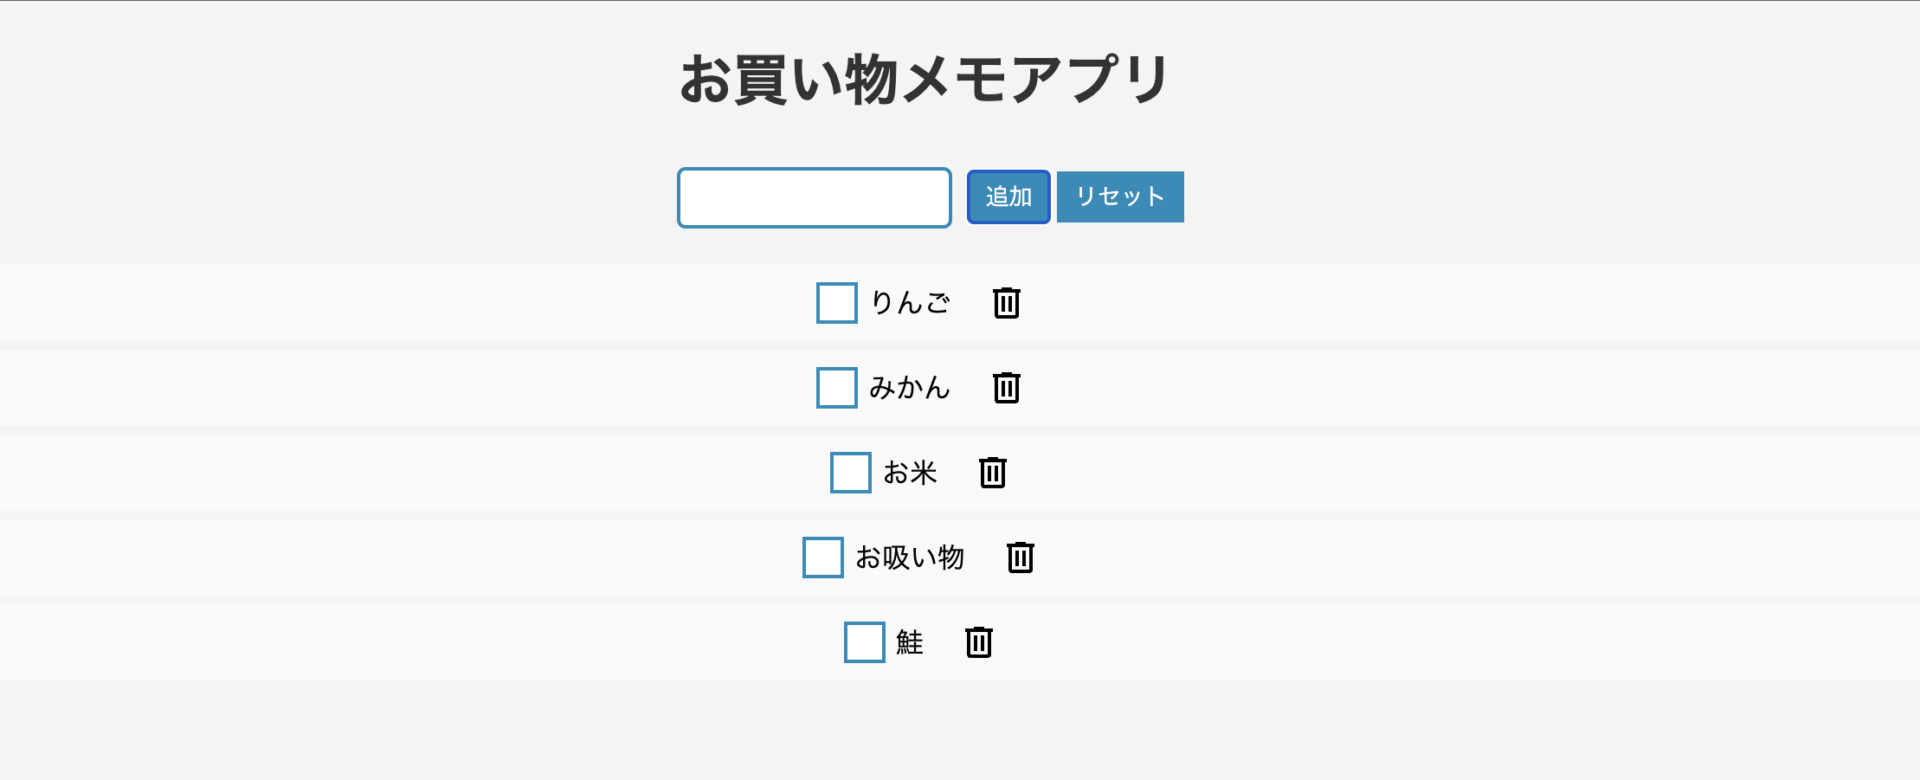
目標成果物
以下のようなお買い物リストアプリを作成します。
ソースコードは以下です。
開発手順
HTML作成
まずはHTMLから作成していきます。
<!DOCTYPE html>
<html lang="ja">
  <head>
    <meta charset="UTF-8" />
    <meta name="viewport" content="width=device-width, initial-scale=1.0" />
    <link rel="stylesheet" href="style.css" />
    <title>お買い物メモアプリ</title>
  </head>
  <body>
    <h1>お買い物メモアプリ</h1>
    <div class="form">
      <input type="text" name="item" class="fancy-input" />
      <button type="submit" class="add-item">追加</button>
      <button type="submit" class="reset">リセット</button>
      <div class="error"></div>
    </div>
    <ul></ul>
  </body>
  <script src="script.js"></script>
</html>お買い物リストが入るulタグは空にしておいて大丈夫です。
後ほどここにJSで要素を入れていくことになります。
CSS作成
「style.css」を作成します。
* {
  box-sizing: border-box;
}

body {
  font-family: "Arial", sans-serif;
  background-color: #f4f4f4;
  margin: 0;
  padding: 0;
}

li {
  list-style: none;
}

h1 {
  text-align: center;
  color: #333;
}

.form {
  text-align: center;
  margin-top: 20px;
}

input[type="text"] {
  padding: 5px;
  margin-right: 10px;
}

button {
  padding: 5px 10px;
  background-color: #008cba;
  color: white;
  border: none;
  cursor: pointer;
}

ul {
  list-style: none;
  padding: 0;
  text-align: center;
}

li {
  background-color: #f9f9f9;
  padding: 10px;
  margin: 5px;
  border-radius: 5px;
  display: flex;
  align-items: center;
  justify-content: center;
}

input[type="checkbox"].styled-checkbox {
  display: none;
}

input[type="checkbox"].styled-checkbox + label {
  position: relative;
  padding-left: 25px;
  cursor: pointer;
}

input[type="checkbox"].styled-checkbox + label:before {
  content: "";
  position: absolute;
  left: -5px;
  top: 0;
  width: 20px;
  height: 20px;
  border: 2px solid #008cba;
  background-color: white;
}

input[type="checkbox"].styled-checkbox:checked + label:before {
  background-color: #008cba;
}

input[type="checkbox"].styled-checkbox:checked + label:after {
  content: "";
  position: absolute;
  left: 6px;
  top: 2px;
  width: 6px;
  height: 12px;
  border: solid white;
  border-width: 0 2px 2px 0;
  transform: rotate(45deg);
}

input[type="checkbox"].styled-checkbox:checked + label {
  text-decoration: line-through;
}

input.fancy-input {
  border: 2px solid #008cba;
  border-radius: 5px;
  padding: 8px;
  margin: 5px;
}

.trash-icon {
  cursor: pointer;
  margin-left: 20px;
}
JavaScript
最後に本題のJavaScriptを作成します。
「script.js」を作成します。
const ul = document.querySelector("ul");
const input = document.querySelector(".fancy-input");
const addBtn = document.querySelector(".add-item");
const resetBtn = document.querySelector(".reset");

addBtn.addEventListener("click", function () {
  const liCount = ul.children.length; // ulタグ内のliタグの数を取得
  const li = document.createElement("li");
  const checkbox = document.createElement("input");
  const label = document.createElement("label");
  const image = document.createElement("img");
  const error = document.querySelector(".error");

  if (input.value === "") {
    error.textContent = "買い物を入力してください";
    return;
  }
  checkbox.type = "checkbox";
  checkbox.classList.add("styled-checkbox");
  checkbox.name = "item" + (liCount + 1);
  checkbox.id = "item" + (liCount + 1);
  checkbox.value = input.value;
  li.appendChild(checkbox);

  label.htmlFor = "item" + (liCount + 1);
  label.textContent = input.value;
  li.appendChild(label);
  input.value = "";

  image.src = "images/trash-icon.svg";
  image.alt = "ゴミ箱アイコン";
  image.classList.add("trash-icon");
  image.setAttribute("data-trash", liCount + 1);
  li.appendChild(image);

  ul.appendChild(li);
  if (error.textContent !== "") {
    error.textContent = "";
  }
});

resetBtn.addEventListener("click", function () {
  ul.innerHTML = "";
});

// ゴミ箱アイコンをクリックしたら、そのliタグを削除する
ul.addEventListener("click", function (e) {
  if (e.target.classList.contains("trash-icon")) {
    const trash = e.target.getAttribute("data-trash");
    const li = document.querySelector(`#item${trash}`).parentElement;
    ul.removeChild(li);
  }
});
ソースコードを見ると、もしかしたら少し難しく感じるかもしれませんが、基本的には追加ボタンが押されたらulタグの中にli要素を作成して入れているだけです。
なお、ゴミ箱アイコンは「images/trash-icon.svg」に保存しています。筆者のGithubからダウンロードしても良いですし、material-iconからダウンロードしてきても大丈夫です。
あとは、リセットボタンが押されたらulタグの中身を空にしています。
また、ゴミ箱アイコンが押された場合は、ゴミ箱アイコンの番号を取得し、その番号に合うli要素のみを削除するようにしています。
このようにして、JavaScriptではイベントごとにHTML要素を操作することでWebアプリケーションを実現しています。JavaScriptを自由自在に扱えるようになると、本当にさまざまなアプリケーションが作れるようになります。
本記事をきっかけにJavaScriptの魅力を知っていただけたら嬉しいです。それでは!

コメント